
Server Modding
The links below offer documentation and source code on modding the server. The server runs using all the Plugins built and placed into the Plugins directory (loaded in alphanumeric order). The base GameSource Project on GitHub is built on EventHandler hooks to things like chat messages, deaths, etc. GameSource also shows an example of how to create your own custom EventHandler for something like triggering a warning when a player enters an area. Though whatever modders want to make is limitless. RP gameplay is implemented in LifeSource project and also an example for a Battlefield type gamemode with the WarSource project. You can create your own plugins to replace or add onto these default Plugins. You’ll also find some UI modding examples in the BPResources unitypackage using Unity’s new UI Toolkit.
- GuideProtocol – Community Modding Guide
- Official Broke Protocol API Documentation
- Broke Protocol GitHub with GameSource Base/Example Plugin
- Broke Protocol API Reference
Asset Modding
Welcome to the Broke Protocol asset modding guide. This will show you how to edit existing assets like weapons, items, vehicles, and even world objects. You can also create new ones altogether. Modded items will be synced to anyone connecting to your server or can optionally be shared on the Steam Workshop.
This guide will just cover the custom asset development process. It won’t cover server/client scripting, Custom UIs, or map editing itself. These topics will be covered in other guides.
If you’re a more visual learner, this guide is also presented in a video where you’ll see the entire modding workflow from start to finish. If you want more specifics however, read on.
Modding Environment
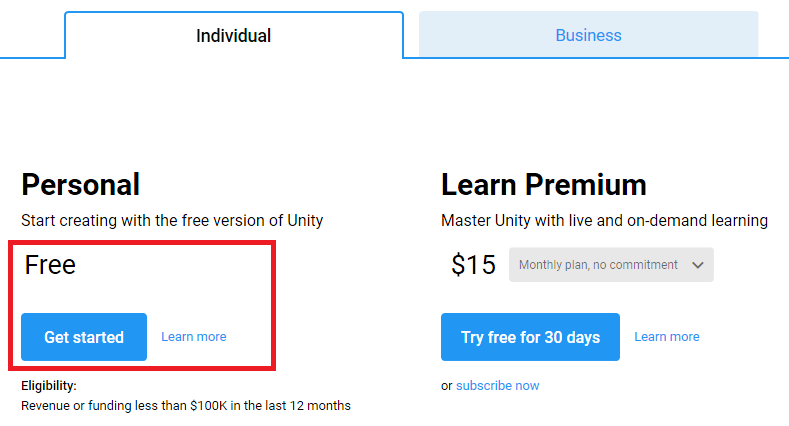
The first thing every mod developer needs is Unity. The free version will work just fine and you can grab the latest version here.
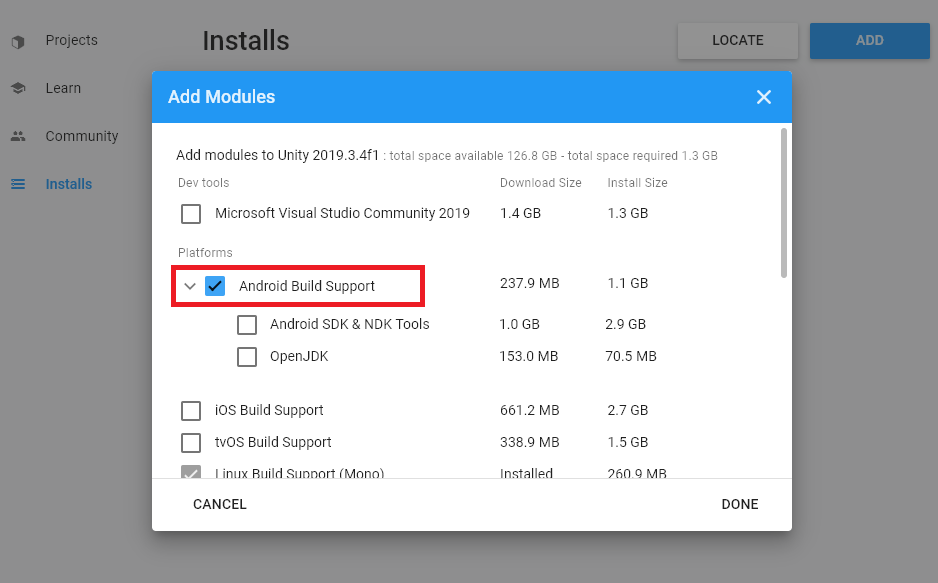
You will need to add Android Build support since the asset bundles will support both PC and Android Platforms, even if your server is just on PC. The NDK or SDK are not required however. This will be enough for modding along with Game Resources package BP provides as part of the base game.
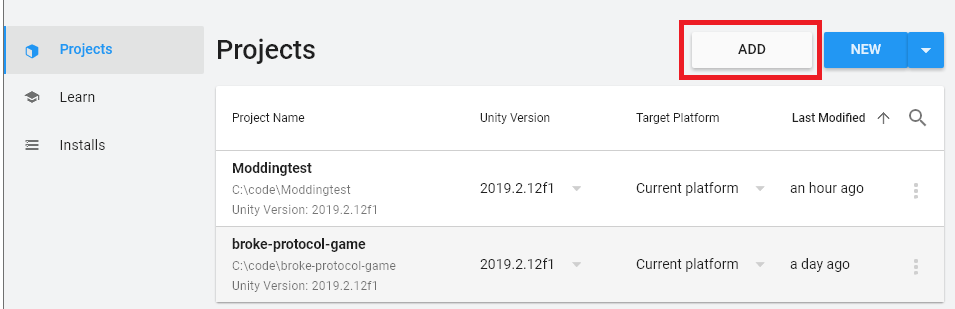
Once you start Unity, you need to create a New Project. This will be your Modding Project that you will develop all your Mods/AssetBundles in. Create it as a 3D project, save it anywhere, and load it up.
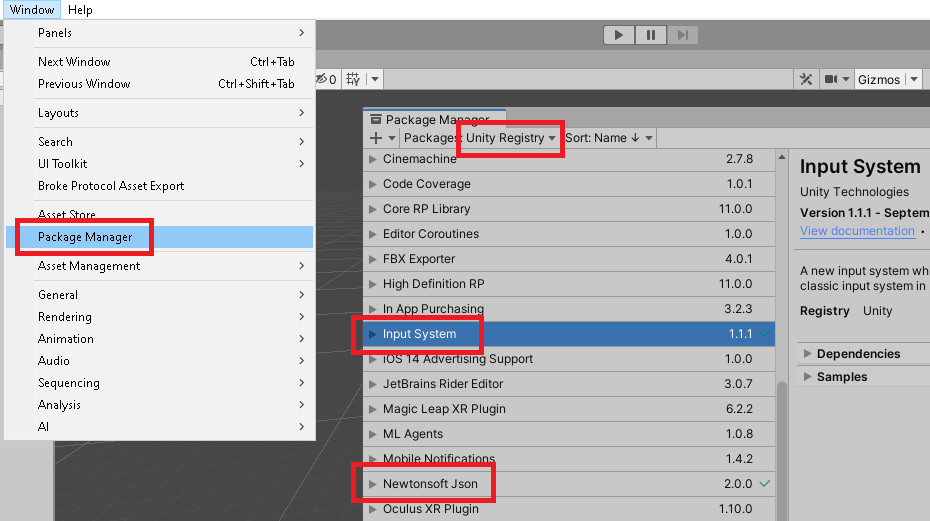
Once you have the project loaded, you’ll need some important Unity Packages. So go ‘Window -> Package Manager.’ Select ‘Unity Registry’ at the top and wait for Unity to fetch the package list.
You need 2 important packages:
- Input System (used for menus in the CharacterPoser scene)
- Newtonsoft Json (if not visible, click the ‘+’ then ‘Add package from git URL’ and fill in “com.unity.nuget.newtonsoft-json” without quotes).
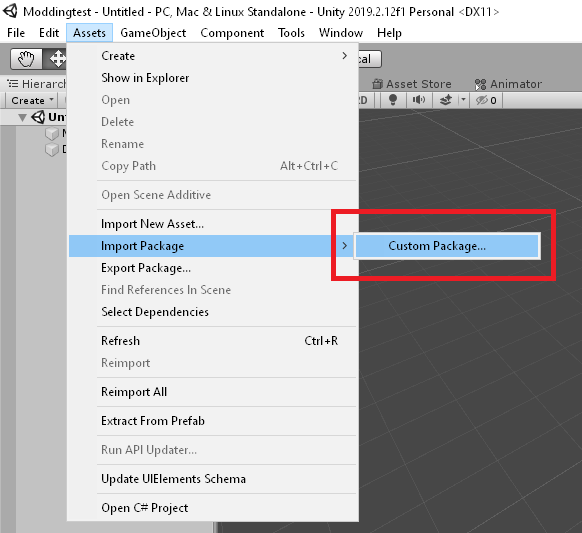
After your packages are installed, you are Ready to import the BP Modding Package. Go to ‘Assets -> Import Package -> Custom Package.’ After that, find and import your BPResources.unitypackage.
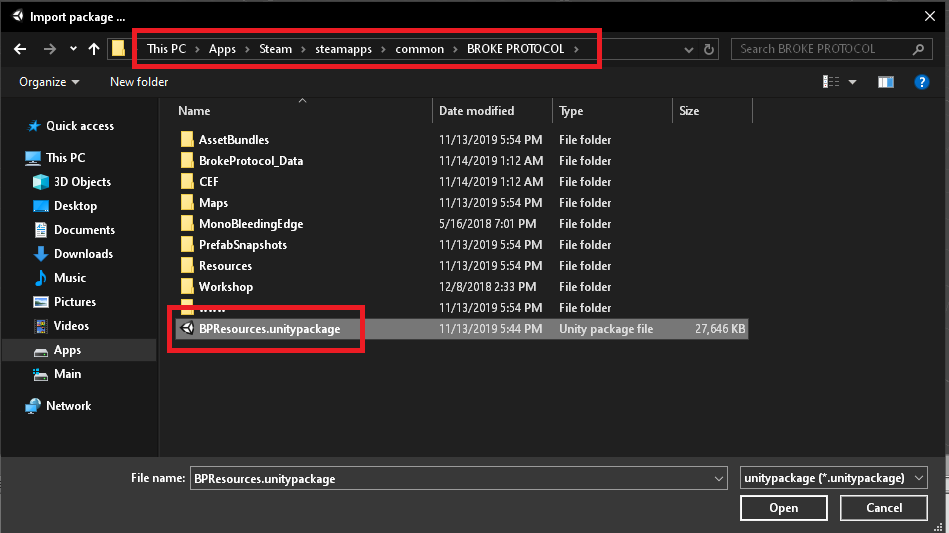
This package contains the modding Resources you’ll need to create custom content for Broke Protocol. The next step is to import and wait a while for the package to decompress.
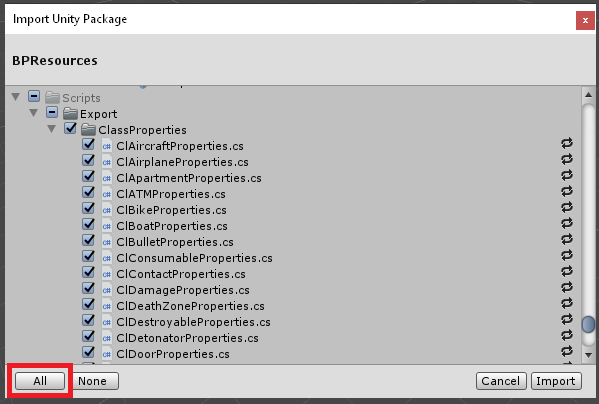
From the package window, make sure to click ‘All’ then ‘Import.’ If future BP releases have new features or assets you’d like to mod, you can repeat this same process for your modding project. The package importer is smart enough to detect and update modified BP resources, while leaving your mods alone. After the import, your development environment is good to go.
This the the Unity Project Window. All package tools, resources, and eventually, your mods will reside here. A quick overview of what’s included with BPResources by default.
Package Tools
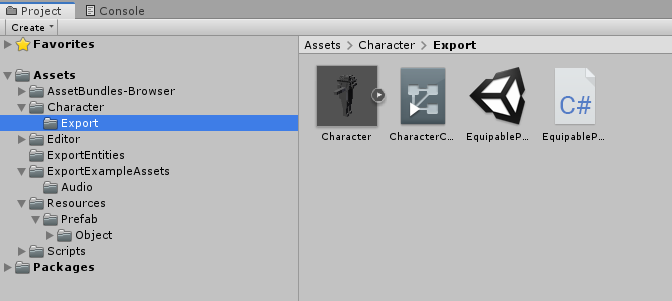
- AssetBundles-Browser – A tool that allows you to export your mods (*.bpa type) via ‘Window -> Broke Protocol Asset Export.’
- Character – Rigged model, clothing items, and EquipablePoser scene to help positioning items in player hands.
- Editor – Scripts that set up the Unity environment (tags/layers) for Broke Protocol development and compatibility.
- ExportEntities – All game entities that game be modded or used as a basis for new custom assets. Entities have scripts that define its properties.
- ExportExampleAssets – Various types of assets showing recommended import settings for models, textures, and audio.
- Resources – All static game objects and props that can be modded. Generally don’t have scripts.
- Scripts – Broke Protocol constants and required classes.
Modding Workflow
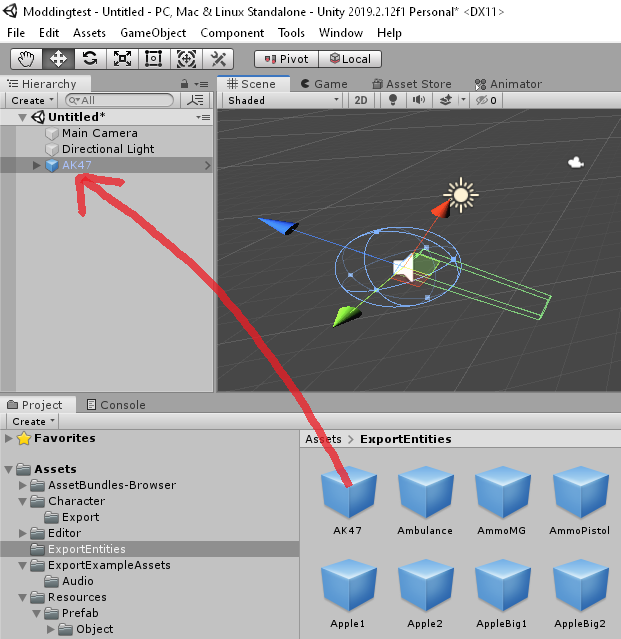
There are a few different ways to develop your mods, and you’ll develop your own preference for doing so over time. The step I like to take first is to find a base object/entity similar to the one I want to mod/edit and create an Instance of it in the scene by dragging it into the Scene Hierarchy. An alternative is to select a prefab and just Ctrl+D to Duplicate it. Then edit with the ‘Open Prefab’ button in the inspector.
Broke Protocol uses names to identify all objects in-game. And there can only be one Object per name. So if we keep the AK47 gameobject name like in the example, any edits done to the properties, mesh, texture, or audio will modify the default AK47 item properties in-game.

If you want to create a new custom asset, you would change the name of the GameObject as shown. Either way, drag and drop your newly created object into the project view anywhere to create an Original Prefab that will serve as the basis for your mod.
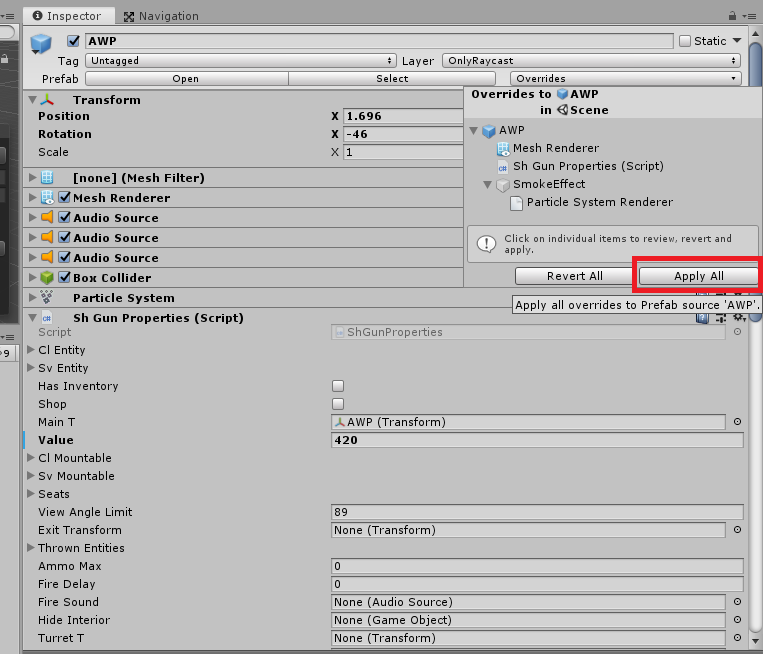
The Inspector on the right side of the editor (with your object selected) contains every single property that defines what your object is, how it renders, the audio clips it plays, materials, meshes, particle systems, etc.
You can edit your custom GameObject either from the Scene instance or the Project/Prefab object directly (using the ‘Open Prefab’ button with your prefab selected). Though if you edit the Scene instance in any way, make sure you click ‘Overrides -> Apply All’ to save your changes back to the Prefab.
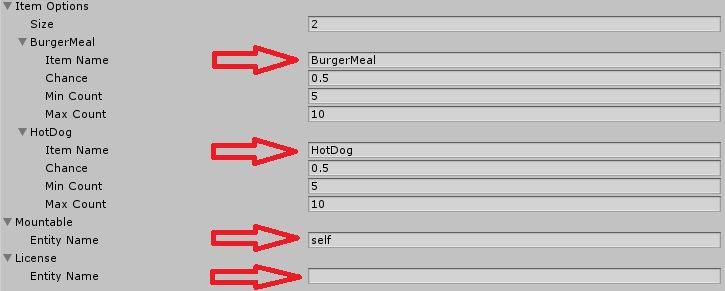
Properties may contain references to other entities in the game. Note you can also reference custom entities too. So a custom gun can use a custom ‘ammoItem’ reference. References are done simply by name so you type the GameObject you want to reference by name in these fields. Note: ‘self’ sets a reference back to itself and a blank field is a null reference for irrelevant fields or fields you don’t want to reference anything.
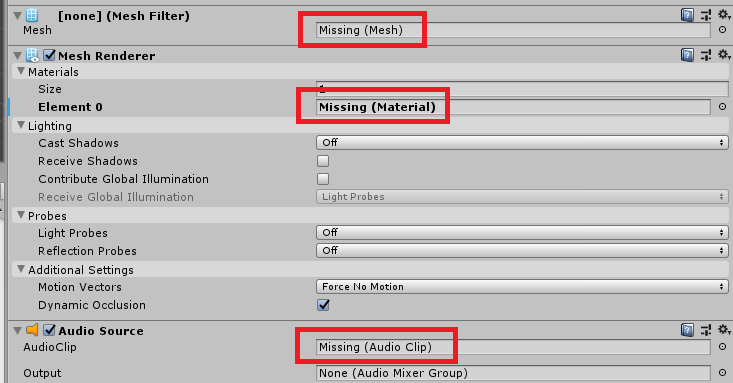
You might notice missing meshes and materials for nearly all default entities/objects in the game. This is done on purpose since if you want to edit an existing item’s parameters, you can just edit the properties and export without art/audio assets to reduce file & transfer size. Broke Protocol will automatically find the default materials, meshes, and audio assets for existing game objects/entities once its loaded in-game. Assigning these missing references will override default game assets for example if you want to replace a specific mesh, texture, or sound effect in-game.
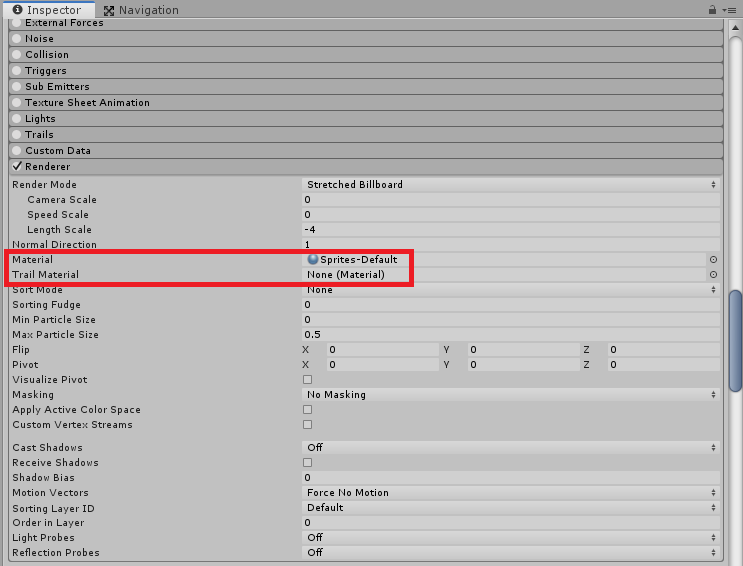
For new items you want to introduce, you normally will fill in every missing field with your own meshes, audio clips and everything to fully produce a working item. Don’t forget all the particle effects too. Most just need the default material set to ‘Sprites-Default.’ Smoke particles generally need the ‘Trail Material’ set instead. You’ll know something isn’t set correctly when you get purple textures or effects in-game.
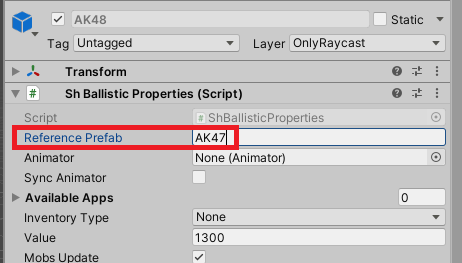
If you want to copy meshes, audio clips, textures, etc. from an existing prefab (to reduce BPA filesize) use the ReferencePrefab field and type in the GameObject name of an existing asset. Then you won’t need any meshes or other art assets, it will be copied during game startup from existing assets.
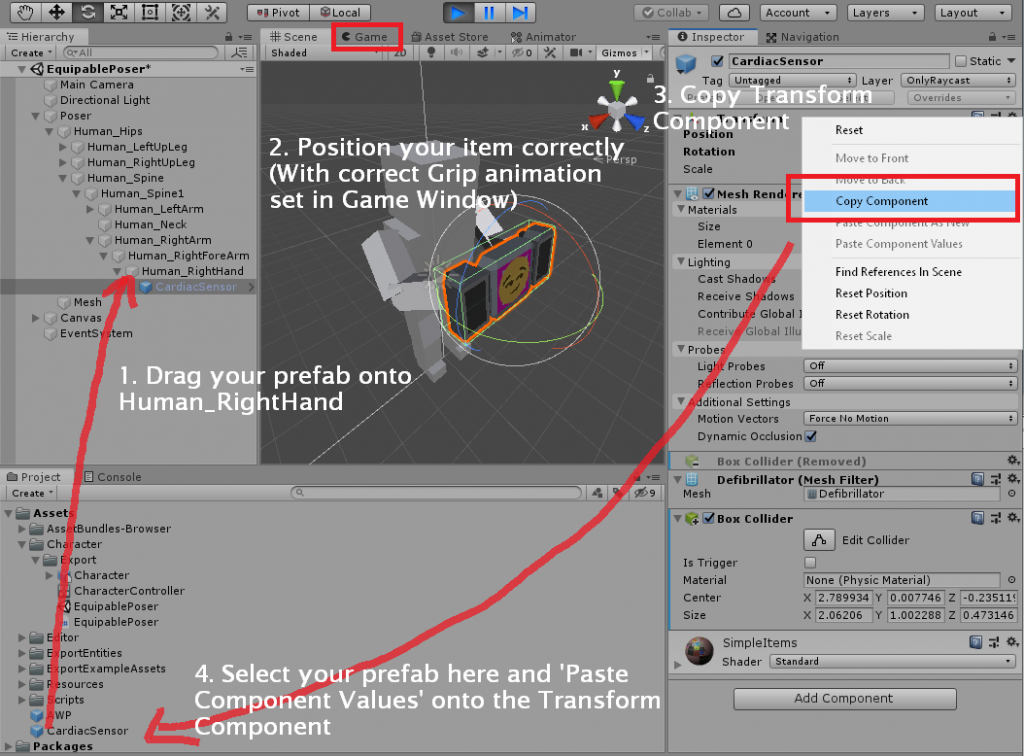
Items that can be equipped, like weapons, need to have a special setup to be positioned in player hands correctly. For this Find the ‘EquipablePoser’ Scene and click Play.
Make sure you have the correct Grip animation selected for your item, then go into Scene view. Drag and drop your prefab onto the model’s ‘RightHand’ Transform (Or ‘Neck’ for Mobs). Use Unity’s controls to position and rotate the object correctly in the player’s hands. Copy the Transform component by ‘Right-Click -> Copy Component.’ Then, select your Prefab in the Project view below. Finally, paste the new Transform by ‘Right-Click -> Paste Component Values.’
Finishing Up
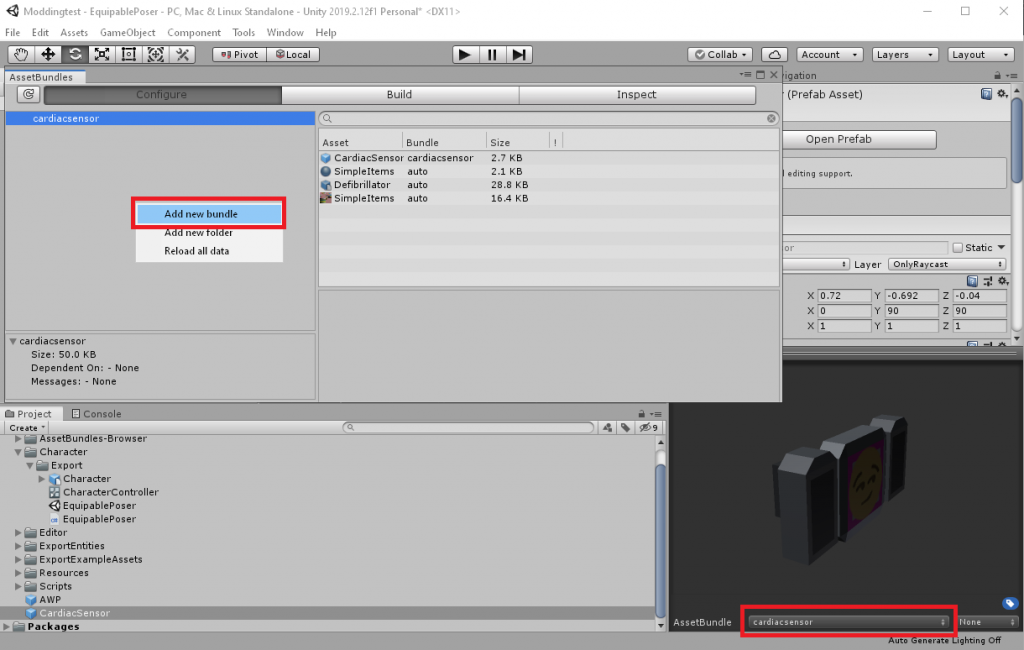
When your asset is ready, the time comes to Building your AssetBundle. Open your AssetBundle Browser by going to ‘Window -> Broke Protocol Asset Export.’ Now you will want to make sure you have an AssetBundle defined by right-clicking in the Browser Window -> ‘Add new bundle.’ Name it anything related to your mod. Add your custom prefabs to the AssetBundle from the Dropdown at the bottom-right of the Prefab Inspector. You can add multiple mods to a single Asset Bundle. That’s the recommended workflow since the AssetBundle will reuse art and audio assets to reduce filesize and scene complexity.
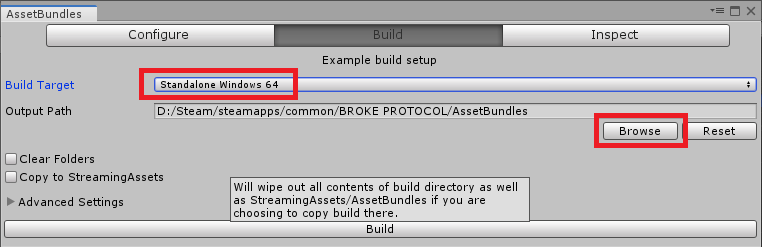
Once your AssetBundle is Configured, open the Build tab and set the Output Path to Broke Protocol’s AssetBundles directory. Finally, click Build (Default settings should be fine here) and kick back! Your asset export will complete in a few moments 🙂
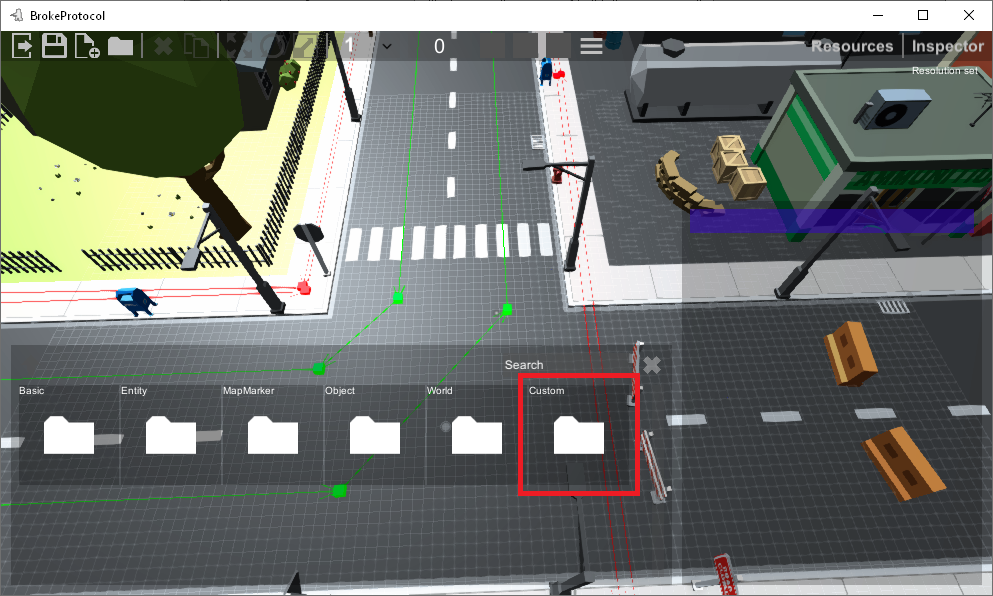
You should be able to find your custom asset in the World Builder within the ‘Custom’ directory. You can now place your modded objects anywhere in your map. It will work in Offline mode and will be automatically shared and cached with connecting players to your server. You can also use the in-game Workshop Uploader to share your custom asset on the Steam Workshop and have a chance to be promoted by the developers.
Tips
- The game expects all Materials to use Unity’s “Standard” shader by default. This is chosen from the drop-down menu in the Inspector when you select any Material. Use “Opaque” Rendering Mode for solid objects, and “Fade” for glass or other translucent materials.
- The game uses 1 foot = 1 unit for everything so try to follow the same scale for your custom models. You may also adjust the Scale Factor setting on the model within Unity if you’re using a pre-made asset pack.
- Most items should have the mesh origin set at the bottom-center of the object. Guns should have the origin set at the guns muzzle so flashes and audio are positioned correctly. If you use an asset pack with a different origin, you can make the gun mesh a sub-object of the parent and move it around until the gun barrel is at the origin.
- If you’re editing your item in the Scene view. Don’t forget to click on ‘Overrides -> Apply All’ in the Inspector to apply all current changes back to your prefab, else your changes won’t export in full.
- Try to combine as many custom mods as you can into a single AssetBundle (*.bpa file). This way, items that share mesh, texture, material, or audio assets will share the single asset instead of being duplicated across BPAs. This will result in smaller total AssetBundle size and faster downloads for players joining your server.
- Keep your modding project! If a new BP release comes and you want to take advantage of new features, you can re-import the latest BPResources package, update your asset (don’t need to start from scratch), and Rebuild your AssetBundle. That’s it!
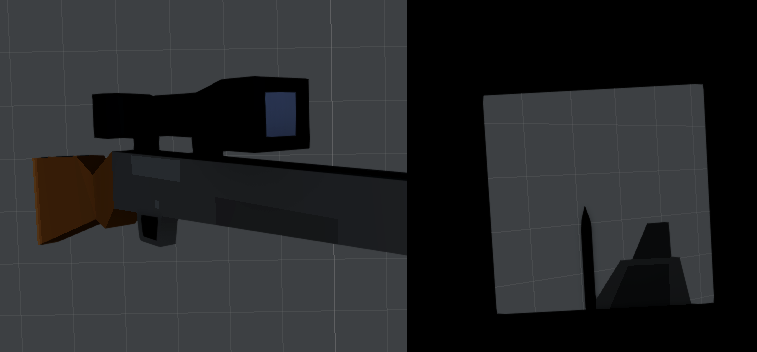
- Scopes are done very simply: Carve a hole through your scope. Then put a one-sided mesh facing frontward for glass, and cross-hairs mesh on the inside facing backwards.
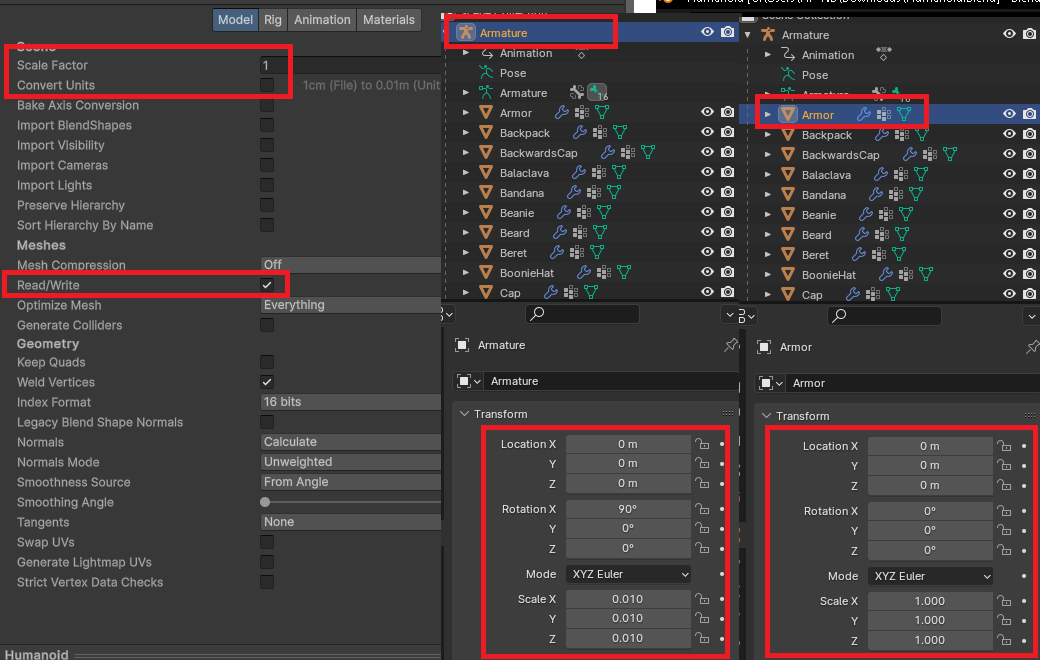
- If your models scale is wrong or you cannot move it around in the World Builder check your Mesh import options and adjust them similar to below (right side shows the Armature parent ).
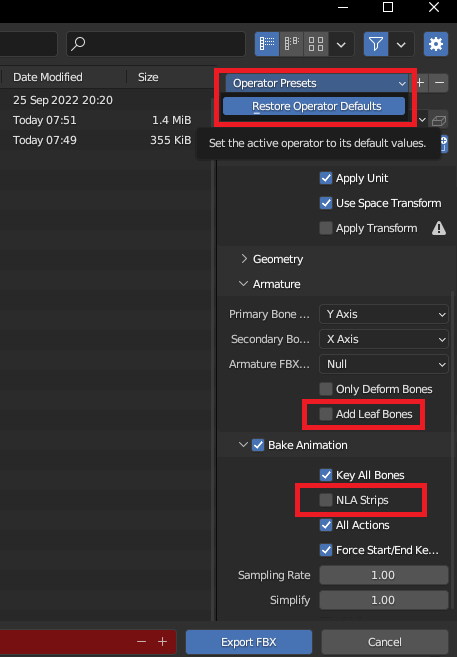
- You can find the Blender project files for Player and Clothing models in ExportExampleAssets/Player within the BPResources package. To export your edits properly for Unity and your own mods, go to File -> Export -> FBX and set Default Export options. Then just make sure Add Leaf Bones and NLA Strips are disabled.
Low-Poly UV Mapping and Texture Guide
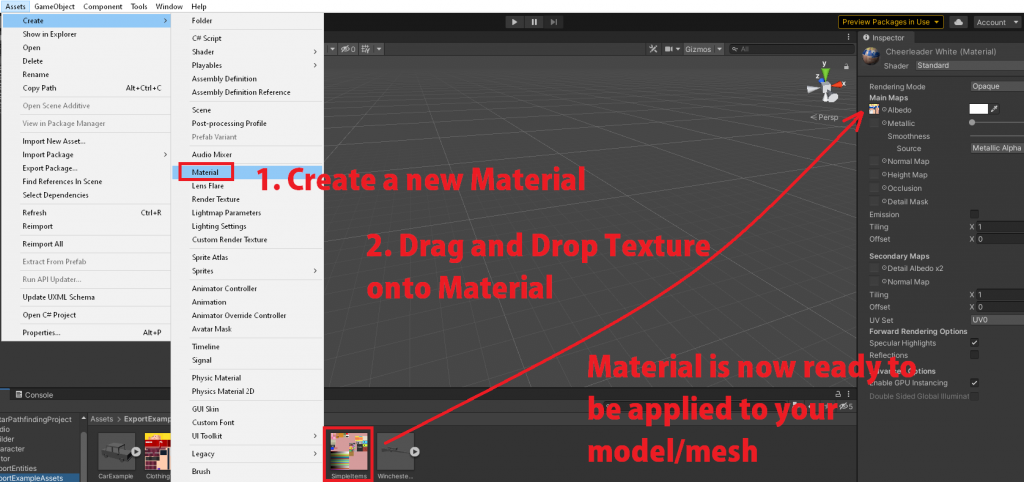
Textures and Materials in Unity
Vehicle Modding Guide
Clothing Modding (Credit to TheUnishark)
Model
First of all, import BPResources into Unity and locate the Character.fbx file in Character/Export/. After opening the file in Maya, Blender or any other 3D Editor, either create your own model or use an existing mesh as your clothing basis. Make sure your bone weights are correctly set in Maya or Blender (mesh vertices mapped correctly to skeleton bones while T-posed).
Unity
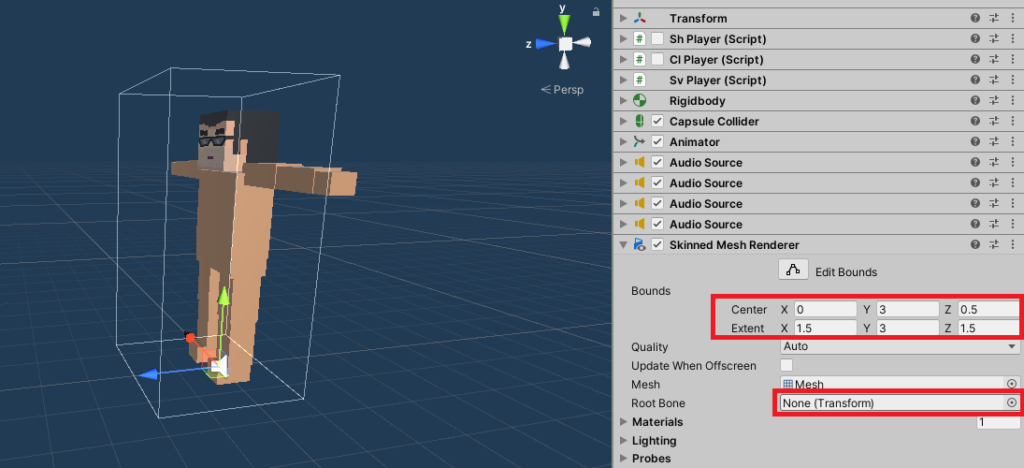
Set the clothing prefab ‘Layer’ to ‘OnlyRaycast’ on the top-right. In the Skinned Mesh Renderer Component, set the Mesh reference to your model and make sure the ‘Root Bone’ is set to ‘None’. Bounds used to be important but in newer versions, the game will automatically handle clothing bounds and colliders so you don’t need to add any or worry about that anymore.
Set your Wearable script properties on the right-side Inspector: Main T is the main Transform Component, Skinned Mesh is your SkinnedMeshRenderer Component. Just drag and drop the relevant components into the missing property slots in the Inspector.
Don’t forget to set the clothing Type, a price (Value), the View Angle Limit to 89, Clip Size to 1. Choose an Item Name, tick Need Item, set a Weight, a Protection level, and Illegal status as required.
Lowpoly Clothing Rigging
Animation Modding (Credit to Marwan)
Custom Entity Actions
Asset mods can have custom actions defined for scripting or other modded behaviors. The actions can call a [CustomTarget] tagged Event on any server plugins currently loaded. Open gates, equip a loadout, or start raining Hellfire missiles. A button example is provided on the GameSource Repo but anything is possible using both scripting and AssetBundles together.
World Builder Guide
Note: The most common error in World building is having overlapping interiors. On the server, all colliders from all interiors are always active. So keep interiors placed underwater and separate from each other to avoid teleporting and NavMesh issues on the server.